This post may contain affiliate links. Every link is hand-selected by our team, and it isn’t dependent on receiving a commission. You can view our full policy here.
Years ago, I made Hocus Pocus-inspired s’mores pops, and they were an unexpected hit. (To this day, I see people recreate them, and it makes me unspeakably happy.) But then I had a child, and my baking days are often late at night, or squeezed within whatever spare 15 minutes I have, when I’m half-exhausted and totally distracted. So I need something simpler.
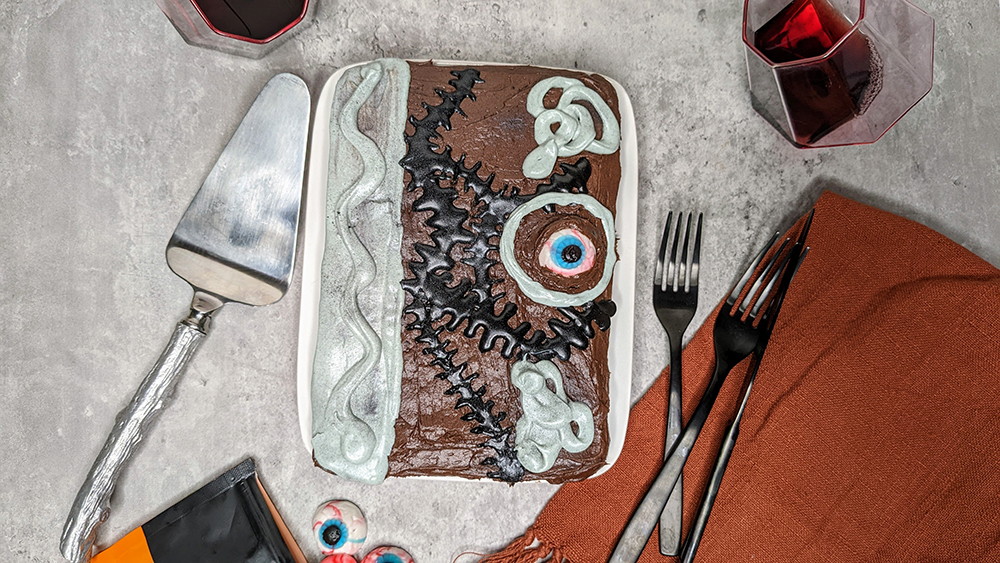
And in honor of Hocus Pocus 2, I decided to go big or go home. And by that, I mean, riff on my earlier concept, only supersize it—so you’re not making a dozen or more teeny tiny books—and make it something even little hands could help prepare. Faster than you can say, “amuck, amuck, amuck,” the Spellbook Cake was conjured.

Here’s What You’ll Need:
- 9″x13″ or 8″x8″ pan
- Chocolate cake mix (or your fave recipe, and any necessary ingredients/supplies)
- 1 batch chocolate frosting, homemade or store-bought
- 1/2 (10 oz.) package white chocolate chips or white Candy Melts
- 1 container black cookie frosting
- large gummy or candy eyes (mine are from Target)
- Black edible shimmer dust (optional)


How to Make a Hocus Pocus-Inspired Book Cake:
- Bake a cake in a 9″x13″ pan—or 8″x8″ square, according to the recipe’s instructions. (I’m all for using a box mix here; they’re easy to carve and still taste moist. Again, shortcuts.) If you bake it in the square pan, let it cool fully and trim it to be more rectangular. Eat the cake scraps as you decorate (bonus!).
- Once the cake has completely cooled, cover it in chocolate buttercream. Add the gummy (or candy) eyeball on the righthand side of the cake, about halfway down it. Nestle it in or use a little chocolate frosting to give it eyelids.
- Make the Gray Chocolate Details: Microwave white chocolate in 30-second intervals, stirring in between, until it’s glossy and drizzle-able. You may need to stir in a teaspoon of butter if it’s a bit thick. (Don’t use water; that will make the chocolate seize and turn gritty.) Stir in a few drops of the black cookie frosting at a time, until you reach a pale gray color.
- Spoon gray chocolate into a plastic bag and snip off one corner. Use it to draw the swirled snake-like shapes on the righthand corners of the “book,” as well as a rectangle along the lefthand side. Smooth out the rectangle, then draw a wavy snake on top of it.
- Use the black cookie frosting to draw “stitches” along the face of the book. For finer, more detailed lines, draw lines with the frosting, then use a toothpick dipped into those lines to make the stitches. (If you draw the stitches with the frosting tube, they tend to be a bit thicker and gloppier, as you can see with some of the lines on my cake.)
- Top with a light sprinkling of shimmer dust, if desired.
Disclaimer: We are not affiliated with Disney or the Hocus Pocus franchise; we’re just fans of the movie (and, hopefully, its sequel).
This post contains affiliate links, which help fund the operation of the site.